

Protect a custom body kit with gentle washing, avoid harsh chemicals on painted trim, and inspect low splitters and side skirts for chips, scuffs, and loose fixings. Effective aftercare for custom body kits also depends on the material: exposed carbon fibre needs protection from weather and UV exposure, while damage should be assessed according to the panel and its finish.
A striking conversion deserves more than a careful handover. Regular, material-aware maintenance helps preserve the finish and catch minor problems before they become more difficult to address. In Dubai, that means treating cleaning and inspection as part of ownership, not an occasional cosmetic reset.
This guide explains how to care for common body-kit materials, wash newly fitted bodywork, and spot issues such as paint mismatch, scuffs, and cracks. You’ll also learn when a localised repair may help and what continued aftercare can involve, so you can protect your vehicle’s appearance and fit with confidence.
Key Takeaways
- Match care and repair methods to the body kit’s material, especially for exposed carbon-fibre components.
- Reduce damage risk by approaching steep ramps and uneven surfaces carefully, and keep low splitters clear of obstacles.
- Wash new bodywork gently and avoid harsh chemicals on painted trim to help preserve its finish.
- Inspect fasteners, brackets, seams and vulnerable lower panels for movement, chips or scuffs, and address problems early.
- Explore Paint Protection Film (PPF) Installation when you want an added layer of protection for vulnerable painted areas.
After-sales support and continued care
After installation, record the body kit’s material, finish, and components. Note whether the conversion includes diffusers, skirts, or exposed carbon-fibre panels. These details help guide cleaning, inspection, and repair decisions, and make it easier to describe a concern accurately, such as a new mark on a painted diffuser or movement at a skirt joint.
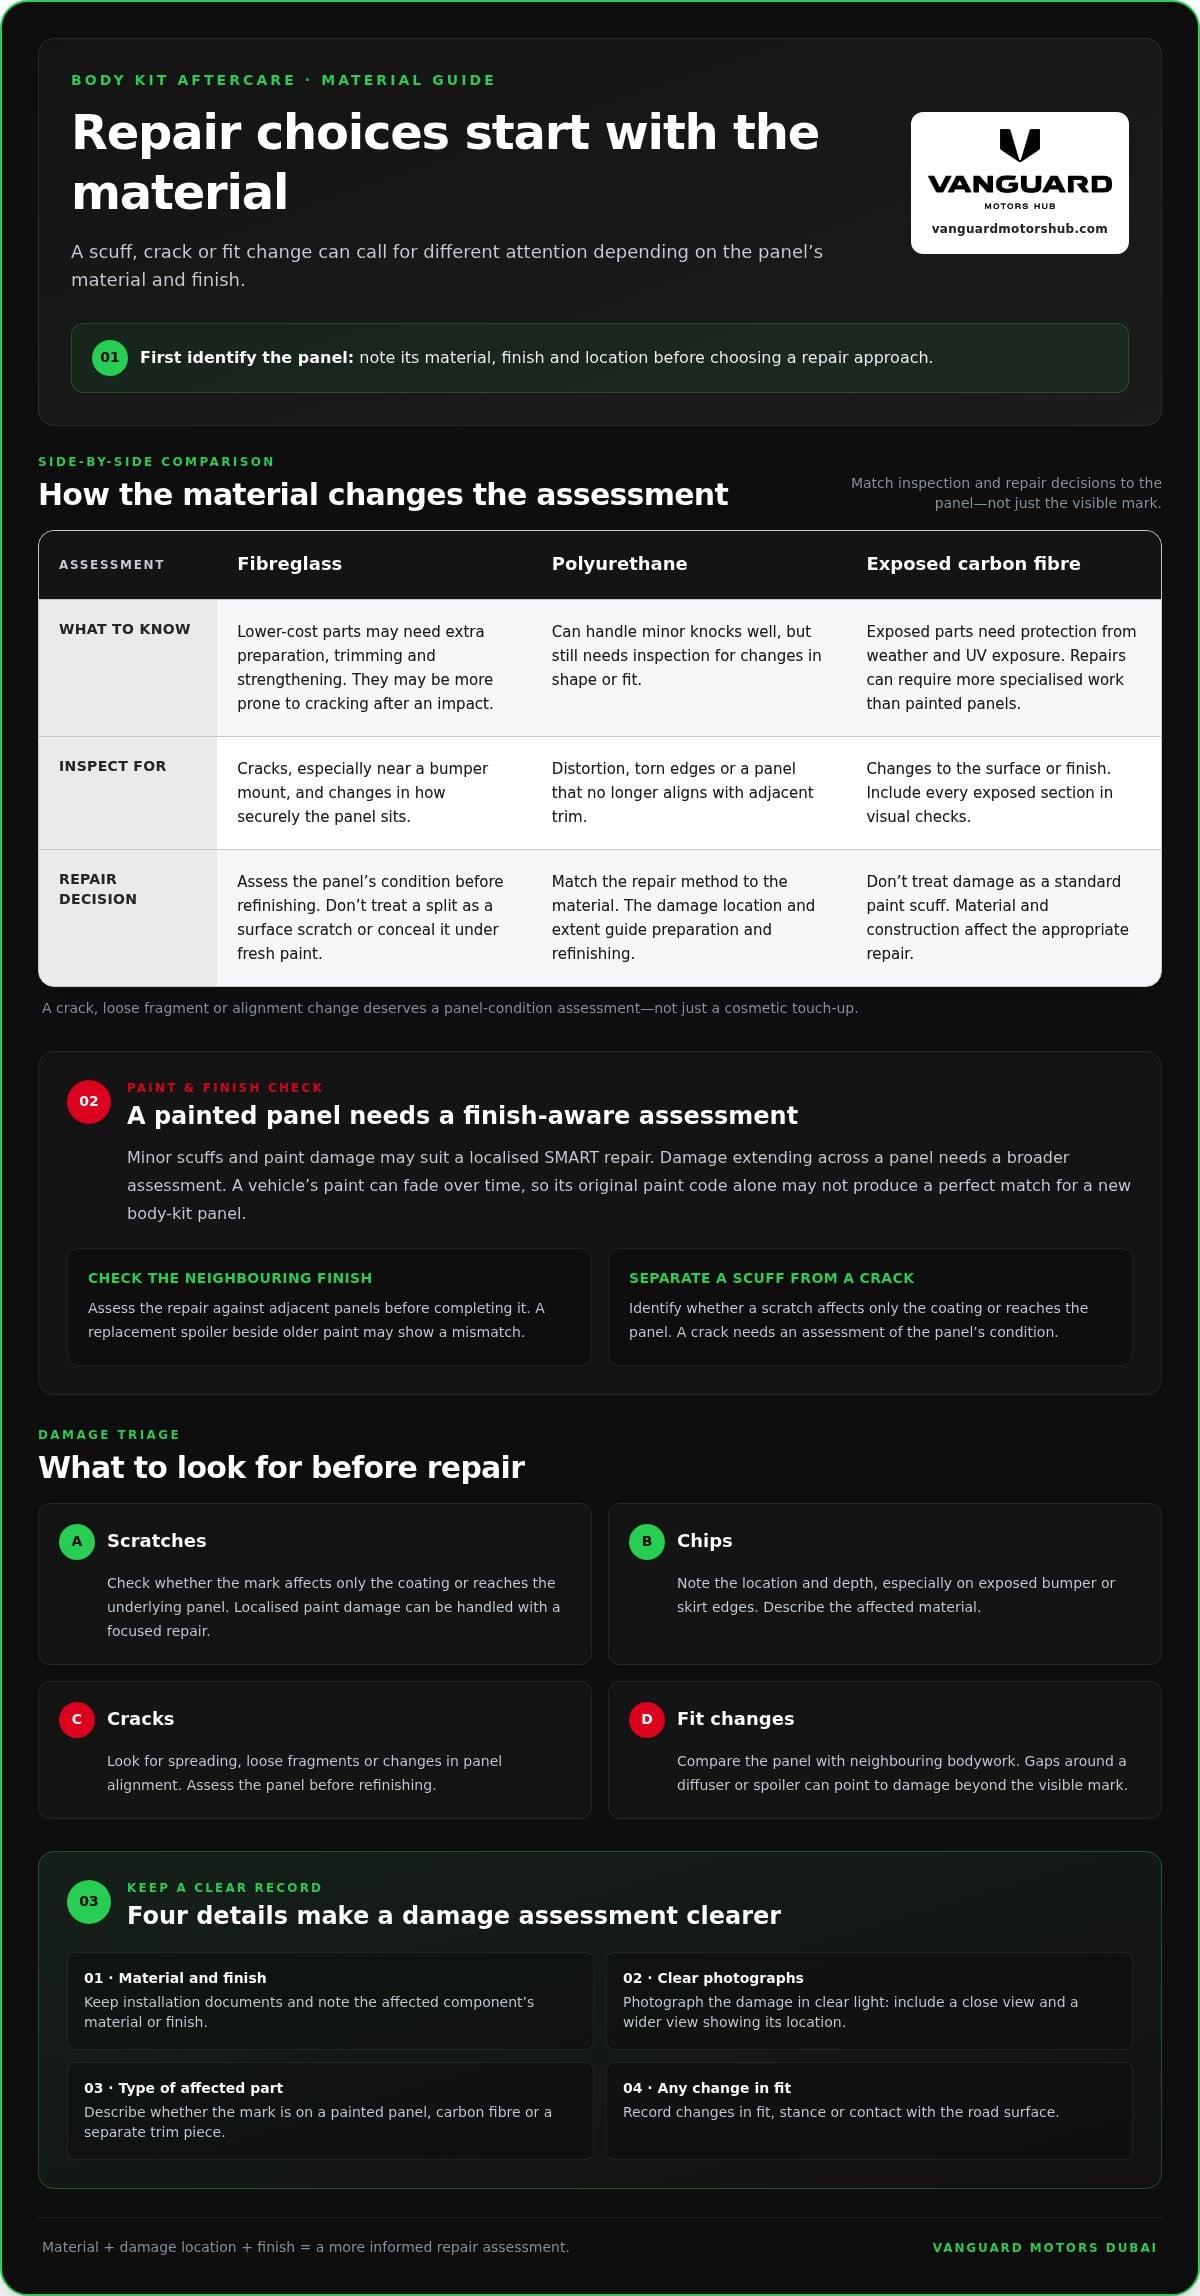
Exposed carbon-fibre parts need protection from weather and UV exposure. Repairs to carbon fibre can also require more specialised work than repairs to painted panels. Include every exposed section in routine visual checks, watching for changes to the surface or finish. If damage appears, don’t treat it as a standard paint scuff: the material and construction affect the appropriate repair.
Use a simple record to support consistent aftercare for custom body kits:
- Keep installation documents and any material or finish details together.
- Photograph new damage in clear light, showing both the affected area and its location.
- Describe whether the mark is on a painted panel, carbon fibre, or a separate trim piece.
- Record any change in fit, stance, or contact with the road surface.
Minor scuffs and paint damage may be suitable for localised SMART repairs. A focused repair can address a small affected area, while damage extending across a panel needs a broader assessment. A surface scuff on a painted skirt, for example, differs from a crack in a carbon-fibre component. Identify the material and damage before choosing a repair method.
Before installation, review your vehicle warranty terms, since the effect of a modification depends on the manufacturer and the specific change. Tell your insurer about significant modifications, including a body kit or repaint. Keep these conversations and relevant documents with your vehicle records. This gives you useful context if a later repair involves the modified parts or their finish.
Continued support is most useful when it addresses a specific change: a loose-looking joint, new crack, finish concern, or damage after contact. Share the affected component, its material, and clear photographs. An assessment can distinguish cosmetic damage from a problem involving fit or mounting. Don’t cover a crack or reshape a panel yourself, as this can hide its original condition and complicate repair.
Common body-kit problems
Before repairing a crack, scratch, or chip, identify whether the panel is fibreglass or polyurethane and match the repair method to its material and finish. Minor paint damage may suit a localised SMART repair, while a crack needs an assessment of the panel’s condition before refinishing.
Fibreglass damage deserves close attention. Lower-cost fibreglass parts may need extra preparation, trimming, and strengthening, and may be more prone to cracking after an impact. A crack near a front bumper mount, for example, can affect both the appearance and how securely the panel sits. Don’t treat a split as a surface scratch or conceal it beneath fresh paint.
Polyurethane can handle minor knocks well, making it a practical material for a daily-driven car. Still, inspect for distortion, torn edges, or a panel that no longer aligns with adjacent trim. A light scuff differs from a crack or displaced section. The material helps determine the repair method, while the location and extent of damage guide preparation and refinishing.
Colour mismatch is another common concern. Vehicle paint can fade over time, so the original paint code alone may not produce a perfect match for a new body-kit panel. This may be noticeable when a replacement spoiler sits beside older paint or a repaired front bumper catches the light differently. Assess the finish against adjacent panels before completing the repair.
- Scratches: Check whether the mark affects only the coating or reaches the underlying panel. Localised paint damage can often be handled with a focused repair.
- Chips: Note the location and depth, especially on exposed edges of a bumper or skirt. Cleanly describe the affected material before repair.
- Cracks: Look for spreading, loose fragments, or changes in panel alignment. Fibreglass may need preparation and strengthening; polyurethane damage still requires material-appropriate work.
- Fit changes: Compare the affected panel with neighbouring bodywork. Gaps around a diffuser or spoiler can signal impact damage beyond the visible mark.
After body kit installation, record the affected panel and photograph damage in clear light. Include a close view and a wider image showing its position on the vehicle. These details help distinguish a small finish defect from structural damage and support a more precise repair assessment. For guidance on a damaged panel, discuss your body-kit repair needs.
Ground clearance and damage prevention
A lower front bumper, splitter, or side skirts can change how your vehicle clears ramps and uneven surfaces. Identify the kit’s lowest points and note how they sit relative to the tyres before driving. Comparing the vehicle before and after installation helps reveal which areas need extra care. The sharper profile calls for deliberate approaches to slopes and obstacles.
Start with the routes you use most. A steep driveway, parking ramp, speed hump, or raised entrance can bring a low splitter close to the ground. Approach uneven transitions slowly and, where space allows, at an angle rather than straight into a sharp incline. This reduces the chance of the front edge making contact. Watch the rear diffuser when reversing over a change in level.
Side skirts need attention when parking. A high kerb or concrete wheel stop can scrape their lower edges even when the front bumper clears comfortably. Choose a position with visible space around the vehicle, and don’t pull forward until a wheel stop disappears from view. On multistorey car-park ramps, move steadily and watch for abrupt transitions between sloped and flat sections.
- Before a new route: Look for steep entries, raised thresholds, and uneven paving.
- At a ramp: Reduce speed and approach gradually, checking the front splitter and rear diffuser.
- When parking: Leave room before kerbs and wheel stops, especially beside extended side skirts.
- After contact: Stop safely and inspect the affected edge for scraping, cracks, or displacement.
Payload can also affect clearance. Passengers or luggage change the vehicle’s ride height, which may bring a low bumper closer to a ramp. Take extra care when the car is loaded, particularly at steep parking entrances. Don’t assume the same route will clear under different loading conditions. Both the added weight and the obstacle’s shape influence the space beneath the bodywork.
Ground clearance is one practical factor to consider before choosing exterior upgrades. Compare the intended stance with the places the vehicle regularly enters, including home driveways and familiar parking structures. An exclusive appearance should still suit daily access. Kit shape, vehicle setup, and driving conditions all affect contact risk, so inspect the lower edges after a suspected scrape. Prompt attention can distinguish surface abrasion from damage that needs repair.
Keep a record of vulnerable spots on your usual routes, such as a steep garage entrance or a sharp transition on a familiar ramp. Use that knowledge to approach slowly, choose another entrance when practical, or park elsewhere. If a splitter repeatedly contacts the same surface, change your approach rather than forcing clearance. Careful route choices help protect bumpers and skirts while preserving the vehicle’s profile.
Washing and maintaining new bodywork
Use a gentle wash routine to protect newly fitted components. First rinse loose dust and grit from the exterior, including the front bumper, skirts, and diffuser. This helps prevent particles from dragging across painted surfaces during washing. Use a soft wash mitt and clean water, working panel by panel instead of scrubbing the entire body at once.
Choose cleaning products carefully. Harsh chemicals can damage painted trim, so use a mild automotive cleaner and follow its directions. Don’t use abrasive pads on a glossy body kit. Textured lower components and smooth painted spoilers need different handling, so use separate cleaning tools for wheels and bodywork. This helps prevent brake dust or grit from transferring to the finish.
Pay attention to joins and recesses. Dust can collect around bumper edges, vents, diffuser fins, and narrow gaps beside side skirts. Rinse these areas gently, then remove remaining water with a clean, soft drying cloth. Avoid dragging the cloth across sharp edges or forcing it into seams. Careful drying protects delicate edges and makes new chips or alignment changes easier to spot.
- Rinse first: Clear loose sand and dust before touching painted surfaces.
- Wash in sections: Clean the bonnet, bumpers, skirts, and rear components separately.
- Use gentle tools: Keep abrasive pads and wheel-cleaning tools away from the body kit.
- Inspect after drying: Look for chips, residue, or a lifted edge around each component.
Dubai’s dusty conditions make regular visual checks useful, particularly after driving on sandy roads or through construction areas. If residue remains around a diffuser or under a bumper, rinse it away instead of rubbing it dry. Where winter travel exposes the vehicle to road salt, remove salt promptly. Salt left on exterior surfaces can remain trapped in seams and around lower components.
Body modifications can alter a vehicle’s appearance and how lower components meet the airflow and the ground. Washing doesn’t require altering those parts; clean them gently and inspect their edges. A front splitter that collects dirt, for example, may also show scrape marks after contact. Note changes in finish or fit, and don’t polish over damage before assessing the surface.
Match your care routine to the body kit’s material and finish. Painted plastic, polyurethane, and exposed carbon fibre have different surface characteristics. A gentle wash removes everyday contamination, while a close visual check can reveal a chip, crack, or loose-looking edge. If the vehicle has several upgrades, clean and inspect each component individually. This helps preserve the exterior and catch new damage early.
How often should you inspect body kit fasteners, brackets, and seams
Inspect the body kit regularly, using each wash as an opportunity for a visual check. Pay particular attention to low splitters and side skirts, where stone chips, scuffs, and loose fixings can appear. Inspect the kit after noticeable road contact or an impact, too. A panel that shifts, rattles, or develops a new gap needs attention, not another routine wash.
Start at the front bumper and move around the vehicle in a consistent direction. Look along panel edges, joins, and visible fastener points. Compare each side with its opposite: a new gap beside one skirt may stand out against an even seam on the other. Check visible brackets, but don’t pull or push a panel to test it, as this can worsen a loose attachment.
Use good light and a clear view. A shaded garage can hide fine cracks or changes in panel alignment, so inspect the finish from more than one angle. Look for:
- Fasteners: Missing, raised, or visibly loose fixing points.
- Brackets: A bent appearance or a panel sitting unevenly near its support.
- Seams: New gaps, lifted edges, or a change in alignment.
- Lower surfaces: Fresh scuffs or chips on splitters and side skirts.
- Edges: Any sharp or dangerous edge that could pose a hazard.
A secure body kit should remain firmly fixed, without sharp or dangerous edges. If an edge is exposed or a panel appears loose, avoid handling it while driving. Arrange an assessment and describe the location, visible movement, and any recent contact. Specify whether the change is at a front splitter, rear diffuser, or side skirt. Clear details help distinguish a finish issue from a fixing concern.
Keep a simple inspection record with dated photographs. Capture the same seam or bracket from a similar angle each time to make changes easier to spot. Note stone chips, scuffs, and any new sound or movement separately. If you find damage, photograph it before cleaning or attempting a repair. Don’t tighten unfamiliar fasteners, since their type and mounting position affect the correct approach.
Consistent checks help identify small changes before they affect fit or safe use. If a bracket, seam, or fixing point looks compromised, arrange an assessment of your body kit.
ABS plastic body-kit parts are relatively flexible and durable, and often provide a close, consistent fit. During winter, remove road salt promptly from the newly fitted body kit.
Vanguard Motors Dubai: Paint Protection Film (PPF) Installation
Vanguard Motors Dubai installs Paint Protection Film (PPF) for owners seeking added protection for painted body-kit surfaces. Consider PPF for exposed areas such as a front bumper or side skirts, where road debris and everyday contact can affect the finish. It complements careful washing and regular inspections, but doesn’t replace them. The areas to protect depend on the kit’s shape, material, and how you use the vehicle.
If you’re planning a body-kit conversion or want to protect painted components already fitted, PPF can be part of your vehicle-care plan. Vanguard Motors Dubai also offers Colored Sticker Wraps, Peelable Paint Applications, and the Vanguard Premium Package for related appearance and protection needs.
To discuss PPF for your vehicle, contact Vanguard Motors Dubai or visit the Vanguard Motors Dubai website.
Make your body kit part of a long-term care plan
Give your vehicle’s modified exterior a care plan that suits its finish, materials, and everyday use. Consistent attention can help you spot changes early and make considered decisions about protection or repair. Effective aftercare for custom body kits is practical: respond to visible wear, keep useful records, and choose care suited to each component.
For added protection or a fresh appearance, Vanguard Motors Dubai offers Paint Protection Film (PPF) Installation, Colored Sticker Wraps, and Peelable Paint Applications. These options serve different priorities, from protecting selected painted surfaces to changing the vehicle’s look. The right next step depends on what you want to preserve or transform.
Ready to discuss care for your body kit? Contact Vanguard Motors Dubai for body-kit care. Take the next step with a clear plan for your vehicle’s finish and a confident approach to its ongoing care.
Frequently Asked Questions
How to care for a custom body kit after installation?
Consistent aftercare for custom body kits starts with gentle washing and regular visual checks. Use a clean, soft wash mitt, rinse away loose grit first, and dry panels with a plush microfiber towel to help reduce swirl marks. Inspect exposed edges, mounting points, and lower sections for lifting, loose fasteners, or fresh impact marks. Avoid leaning on newly fitted pieces, and follow the installer’s instructions for the specific material and finish.
How long should you wait before washing a newly installed body kit?
Wait until the installer confirms the kit’s adhesive and finish are ready for washing. There is no universal waiting period: the correct interval depends on the mounting method, adhesive, paint or coating, and installation conditions. Until then, keep the vehicle out of automatic washes and avoid spraying water directly at seams or edges. Ask the installer about the care window before leaving, especially if the vehicle may encounter dust or rain.
What cleaning products are safe for custom body kits and automotive paint?
Choose a pH-neutral automotive shampoo, clean water, and soft microfiber tools for routine washing. Avoid household detergents, abrasive compounds, stiff brushes, and cleaners containing strong solvents, which can dull paint or affect a kit’s surface. For tar, insects, or bird droppings, use a product labelled safe for automotive paint and follow its directions. Test an unfamiliar cleaner on a discreet area before applying it across a visible panel.
Does a custom body kit need special waxing, polishing, or ceramic coating?
A custom body kit doesn’t automatically need a different routine, but suitable protection depends on its finish and material. Wax or polish intended for painted panels may not suit textured plastic, unpainted trim, wraps, or protective film, so check compatibility first. Ceramic coating also requires a prepared surface and compatible finish. Vanguard Motors Dubai installs Paint Protection Film, which can add a protective layer to selected painted areas.
How can you prevent scraping and damage to a low front splitter or side skirts?
Approach steep ramps, speed humps, and driveway transitions slowly and at an angle when there’s safe clearance. Leave extra room from kerbs when parking, and don’t pull forward until you can see the front splitter’s position. Learn the kit’s lowest points before driving unfamiliar routes, and check underneath after contact rather than continuing with a loose or cracked component. If damage exposes a sharp edge or affects fitment, arrange an inspection before driving further.