

A chip in forged carbon fiber doesn’t automatically mean the part needs replacing. Fixing chips in forged carbon fiber starts with checking whether the damage is limited to the surface finish or reaches the carbon weave. Surface marks may be filled and refinished, but cracked or damaged fibers need a more careful assessment.
It’s tempting to focus on making a blemish disappear, especially on a visible exterior part. The key question, though, is whether the carbon itself is intact. A neat finish matters, but sanding or filling won’t solve underlying fiber damage.
This guide explains how to inspect a chip, distinguish cosmetic damage from a deeper crack, and approach filling, sanding, and refinishing a surface-level mark. It also covers when a professional repair makes sense and when replacing the part may be more practical. Start with a close inspection, not a quick dab of resin.
Key Takeaways
- Assess whether a chip affects only the surface finish or reaches the carbon weave before choosing a repair.
- Match the repair approach to the damage: small cosmetic chips and cracks that affect the fibers need different treatment.
- Allow epoxy and coatings to cure fully before sanding or polishing, or the finish may be compromised.
- Use the damage’s depth, location, and extent to judge when professional repair or part replacement is the safer choice.
- Explore how paint protection options can complement a repaired vehicle’s exterior finish.
How to Fix Carbon Fiber Cracks: Repair or Replace?
Repair a chip when the damage is limited to the finish. Seek specialist help if the carbon fibers are cracked or delaminated. Fixing chips in forged carbon fiber begins with distinguishing a surface blemish from damage to the weave.
For a small surface repair, gather epoxy resin, sandpaper, isopropyl alcohol, and UV-resistant automotive clear coat. Repairing damaged fibers may also require matching carbon-fiber cloth. Use epoxy made for composite repair and a clear coat compatible with the cured resin.
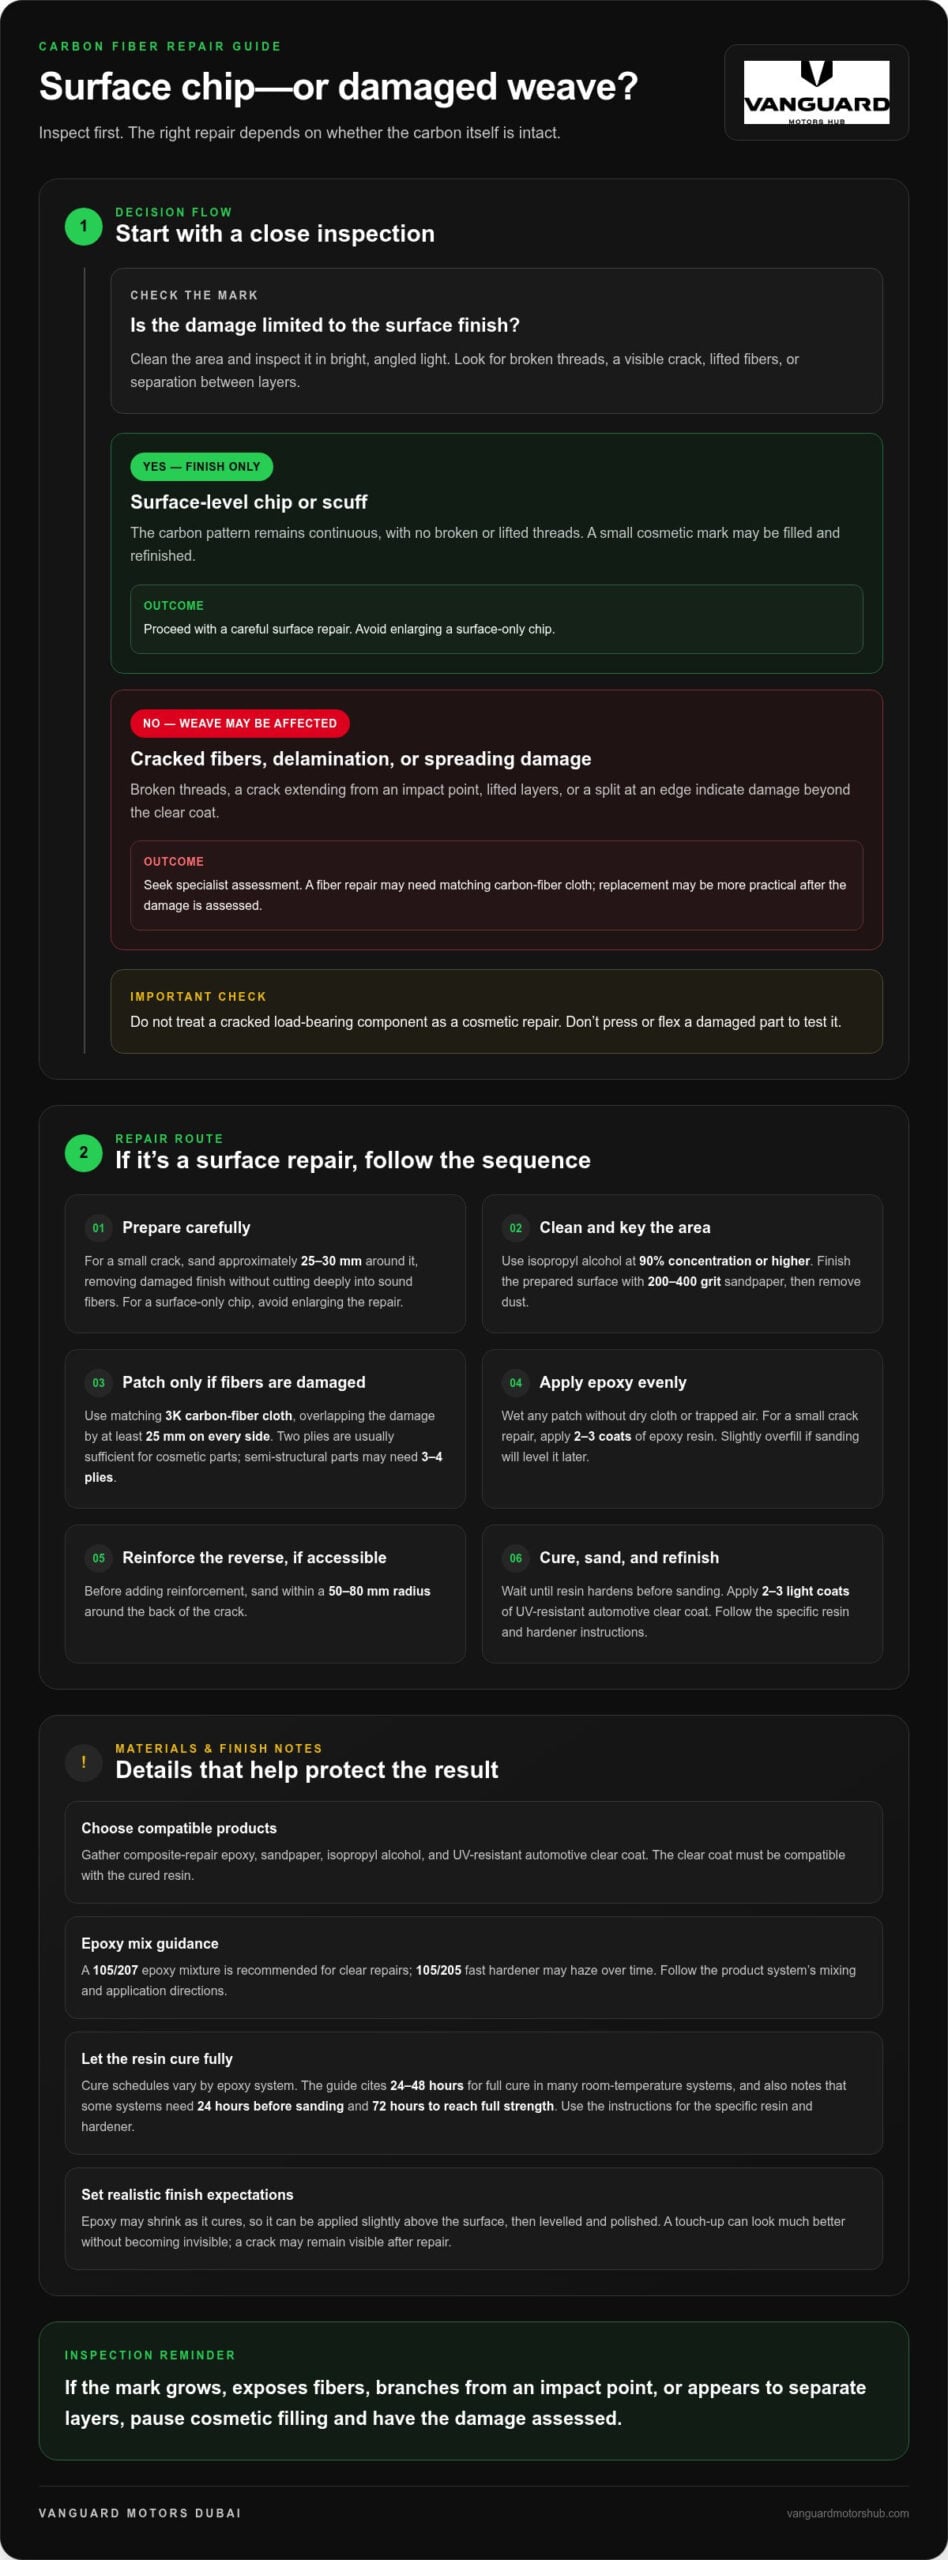
A 105/207 epoxy mixture is recommended for clear repairs; 105/205 fast hardener may haze over time. Follow the product system’s mixing and application directions.
- Check the damage. Clean the area and look for broken threads, a visible crack, or separation between layers. Shallow stone chips may need surface filling, while cracked fibers require more than clear coat.
- Prepare a small crack. Sand approximately 25-30 mm around it, removing damaged finish without cutting deeply into sound fibers. For a surface-only chip, avoid enlarging the repair.
- Clean the bonding area. Use isopropyl alcohol at 90% concentration or higher, then finish the prepared surface with 200-400 grit sandpaper. Remove dust before applying resin.
- Fit a patch when fibers are damaged. Choose carbon-fiber cloth with a matching 3K weave. Overlap the damage by at least 25 mm on every side. Two plies are usually sufficient for cosmetic parts; semi-structural parts may need 3-4 plies.
- Apply epoxy evenly. Wet the patch without leaving dry cloth or trapped air. For a small crack repair, apply 2-3 coats of epoxy resin. Slightly overfill the repair if sanding will level it later.
- Reinforce the reverse side when accessible. Sand within a 50-80 mm radius around the back of the crack before adding reinforcement. Don’t treat a cracked load-bearing component as a cosmetic repair.
- Cure and refinish the repair. Many room-temperature epoxy systems need 24-48 hours for full cure. Sand only after the resin hardens, then apply 2-3 light coats of UV-resistant automotive clear coat. Careful curing and finishing are essential when fixing chips in forged carbon fiber.
Epoxy can be applied slightly above the surface because it may shrink as it cures, then levelled with abrasives and polished. A touch-up may look much better without becoming invisible. A crack may remain visible after repair, and damage beneath the finish may require further assessment.
Causes and identification of chipped carbon fiber
Help prevent new chips by avoiding curb contact, loose road debris, and careless tool handling around exposed carbon surfaces. Clean damage promptly, then inspect it again if the mark grows or reveals fibers.
Impact and abrasion leave different clues. A sharp strike can create a localized chip, while repeated rubbing may wear the finish along an edge. Identify the damage before choosing a repair.
- Locate the likely impact point. Look for a small crater, star-shaped mark, or sharp-edged depression where a stone or tool may have struck. A splitter chip about an inch across has been described as reaching the carbon threads. Exposed threads mean the damage goes beyond the clear coat.
- Separate finish damage from fiber damage. Examine the mark in bright, angled light. A surface scuff may leave the underlying pattern continuous, while broken or lifted threads indicate damage to the carbon itself. This distinction matters because damage limited to the gelcoat needs a different repair from damage to the weave.
- Check edges and corners first. Bumpers, splitters, mirror housings, and trim edges can take direct knocks or scrape against nearby surfaces. Inspect both sides of an edge where accessible. A missing flake at the lip may conceal a longer split, so follow the visible damage rather than filling only its centre.
- Look for signs of spreading. Compare the mark with the surrounding finish and check for branching lines, lifted coating, or a change in surface level. A crack extending beyond the impact point suggests more than a shallow chip. Don’t press or flex the component to test it, as this may worsen damaged fibers.
- Clean gently before judging the surface. Remove loose dirt with a soft cloth and suitable surface cleaner, then let the area dry. Dirt can hide fine cracks and make a shallow mark look deeper. Don’t scrape exposed threads or use abrasive tools before establishing whether the weave is intact.
- Record the damage before repair. Photograph the chip straight on and from an angle, including an undamaged section for comparison. Note whether it is on a flat surface, an edge, or a mounting point. These details help distinguish an isolated cosmetic blemish from damage that may affect the component’s fit or stability.
- Protect the area from further contact. Keep tools, luggage, and cleaning equipment from rubbing against the exposed spot. If fibers are visible, or a crack extends from an edge, avoid cosmetic filling until the damage is assessed. You can discuss a carbon-fiber damage assessment before attempting a surface repair.
Curing, sanding, and refinishing repairs
- Follow the epoxy’s cure schedule. Resin that feels dry may still be soft beneath the surface. Many room-temperature systems need 24 hours before sanding and 72 hours to reach full strength. Keep the repaired piece still during curing, and follow the instructions for its specific resin and hardener.
- Control the cure environment. A temperature-controlled area around 75°F to 90°F (24°C to 32°C) supports a consistent cure. Avoid direct heat or rapid temperature changes, which can affect the finish. An elevated-temperature post-cure example is 60°C for 4 hours, but use it only when the epoxy system permits it.
- Match fiber direction during a patch repair. Align each carbon-fiber sheet with the original weave or the component’s stress direction. If the correct orientation is uncertain, a cross-weave layup at ±45° is a suggested approach. Poor alignment can leave the repair visibly mismatched and may compromise its intended reinforcement.
- Reserve autoclave curing for suitable repair work. Autoclave curing typically uses temperatures between 120°C and 180°C. That is specialized equipment and a controlled process, not a substitute for room-temperature epoxy instructions. Don’t place a repaired automotive component in an oven or autoclave unless its materials and cure system are designed for that cycle.
- Level the cured repair in stages. Use wet/dry abrasives progressively, moving through 120, 240, 400, 600, 1000, 1500, and 2000 grit as needed. Keep the sanding focused on the raised resin or coating. Check the surface between grades, since deep scratches left by coarse paper can show through clear coat.
- Keep the original weave visible. Sand with controlled pressure and avoid cutting through sound carbon fibers. If a repair exposes bare carbon across a bonnet, one suggested approach is to re-resin the full bonnet before relacquering. Spot refinishing may leave a noticeable transition against the surrounding finish.
- Apply the finish only after the surface is ready. Remove sanding residue, then apply an automotive clear coat compatible with the cured repair. Build an even finish across the affected area; a forum suggestion uses at least 4 coats over the entire carbon-fiber piece. Let each layer dry as directed before polishing.
- Polish only after the coating hardens. Paint or clear coat that is still soft can lift during sanding or polishing. Under angled light, check for sanding scratches, haze, or a visible repair edge. Polyester resin can yellow quickly, so avoid it for carbon-fiber refinishing.
When to seek professional repair or replace a part
Choose based on what the damage affects: the finish, carbon fibers, or the component’s function. A hidden crack or delamination changes the decision.
-
Compare DIY and Professional Repairs
Match the repair to your skill and the damage’s reach. A shallow clear-coat chip can suit careful cosmetic work, but broken fibers, a crack near a mount, or uncertain damage calls for professional assessment. DIY carbon-fiber repair can take 4 to 12 hours, including learning, application, and curing.
- Keep DIY work cosmetic. Limit home repair to a stable surface blemish that doesn’t expose broken threads or extend into a joint. Work requires controlled sanding, compatible resin, careful mixing, and patience through curing. A rushed patch can leave an uneven finish or conceal damage without restoring the fibers.
- Escalate complex damage. Seek a specialist for branching cracks, exposed or lifted weave, delamination, or damage near fasteners. A tap test in a bike-frame case identified a 40 mm delamination zone extending from a crack into the tube wall. The example shows why visible crack length alone may not reveal the full repair area.
- Set realistic finish expectations. Touch-up repairs can improve appearance, but they aren’t expected to look perfect. A crack may remain visible, and damage can involve the fabric beneath the surface. Prioritize the integrity of the part over making a surface mark disappear.
-
Decide Whether to Repair or Replace
Check whether the carbon weave remains intact and the component still fits securely. A professional repair may suit localized fiber damage when sound material surrounds it. Extensive damage can make replacement more practical.
- Repair localized damage. Consider repair when the affected area is contained, surrounding fibers are stable, and the component’s mounting points remain sound. The repair needs to address the carbon itself if threads are broken, rather than simply covering the mark with clear coat.
- Replace badly damaged parts. Replacement becomes the stronger option when damage is widespread, the weave is extensively compromised, or a prior repair cannot restore the component’s shape and secure fit. Don’t treat a large crack as cosmetic solely because its surface can be filled.
- Use function as the deciding test. Inspect mounting edges, attachment points, and any area that carries load. If a crack crosses those zones or the part shifts from its original position, stop using cosmetic filler as the solution. Ask for a carbon-fiber repair assessment that considers both structure and finish.
Inspecting carbon fiber damage
- Start with a clean, dry surface. Use a soft cloth to remove dust and road film, then let the component dry completely. Dirt can disguise fine cracks or make a shallow mark look deeper. Don’t scrape exposed fibers; first establish whether the damage is limited to the coating.
- Use angled light to map the mark. Move a focused light across the surface instead of looking straight down. A raised edge, depression, branching line, or cloudy patch can reveal damage hidden by overhead lighting. Check the area from several angles, including the transition between the chip and intact finish.
- Compare the finish with the visible weave. A clear-coat or gelcoat chip may leave the carbon pattern beneath it continuous. Broken, lifted, or frayed threads suggest the weave itself may be affected. This distinction matters: coating damage and fiber damage require different repair approaches.
- Inspect the entire component, not only the impact point. Follow any visible crack towards nearby edges, mounting points, and openings. A chip on a splitter lip, for example, may extend farther along the edge than its front-facing mark suggests. Check both faces where accessible, without flexing the part to test it.
- Use a gentle tap test only as a screening check. Lightly tap around the suspected area and compare the sound with nearby intact material. A change in tone may indicate separation between layers, but sound alone cannot show its full extent. Don’t strike the surface or treat a similar sound as proof that the part is structurally sound.
- Look for changes around fasteners and joints. Examine bolt holes, brackets, and seams for cracks, movement, or separated finish. Damage near an attachment point needs particular attention because the component must remain securely fitted. Don’t tighten hardware to force a cracked or shifted part back into position.
- Document what you find before sanding. Take clear photographs from directly above and from an oblique angle. Include a nearby undamaged area for visual comparison, and note whether threads are visible or only the finish is chipped. These records help track changes in a crack and explain the damage during a professional assessment.
- Choose the next step from the evidence. A stable surface blemish with an intact weave may suit cosmetic refinishing; exposed or broken fibers, suspected delamination, or damage near a mount needs specialist evaluation. If the inspection leaves uncertainty, discuss a carbon-fiber damage assessment before attempting a repair.
Vanguard Motors Dubai: Paint Protection Film (PPF) Installation
Vanguard Motors Dubai installs Paint Protection Film (PPF) to help protect a vehicle’s exterior finish after a carbon-fiber part has been repaired or replaced. PPF is a protective layer, not a repair method. Address cracks, exposed fibers, or other underlying damage before considering surface protection.
For drivers looking to change their vehicle’s appearance, Colored Sticker Wraps and Peelable Paint Applications offer customization options. The right next step depends on whether the priority is protecting a sound finish, changing its look, or resolving damage first.
Contact Vanguard Motors Dubai to discuss the right next step for your vehicle.
Make the Next Move with Confidence
Let the part’s condition guide your next move, rather than the pressure to make a mark disappear. A considered approach to fixing chips in forged carbon fiber protects the finish while keeping the component’s integrity in focus. If you’re unsure how to proceed, pause before sanding, filling, or applying another coating. Describe what you’ve observed to Vanguard Motors Dubai and discuss the next step for the damage.
Vanguard Motors Dubai can help you consider the appropriate direction for your vehicle, whether you’re weighing repair, replacement, or a finish-focused update. A clear conversation can help you move from inspection to a practical plan without rushing the decision. Contact Vanguard Motors Dubai for repair advice and take the next step toward a finish you can feel confident about.
Frequently Asked Questions
How do you repair chips in forged carbon fiber?
For a shallow chip, clean the spot and fill it with a small amount of clear epoxy or lacquer. A fine brush can help apply tinted clear lacquer precisely where the dark surface pattern is missing. Let the filler harden before levelling and polishing. If the chip exposes broken carbon threads, surface filler won’t restore them; the repair must address the damaged fibers.
How do you tell whether a forged carbon fiber chip is cosmetic or structural?
A cosmetic chip affects the top coating while the weave beneath remains continuous. Exposed, frayed, or broken threads point to damage in the carbon itself. Inspect the reverse side and nearby attachment areas, too. A crack near a mounting point or a change in fit matters more than appearance alone. Don’t flex the part to test it, as movement could worsen the damage.
What are the steps for sanding, filling, and refinishing a forged carbon fiber chip?
Work in sequence: remove loose finish, clean away residue, add compatible filler, and let it harden before levelling. Use controlled, progressively finer wet/dry abrasives, then apply a suitable automotive clear coat. Keep sanding away from intact weave; aggressive material removal can expose fibers beyond the original chip. Inspect under angled light before polishing so remaining ridges or scratches don’t become more visible under the final finish.
Can chipped forged carbon fiber be repaired at home, or does it need a professional?
Home repair may suit a small, stable blemish that affects only the finish. A crack, exposed fibers, separation between layers, or damage around a mounting point calls for professional assessment. A small mark on removable cosmetic trim, for example, presents a different repair challenge from a crack in a load-bearing component. Don’t use filler to conceal damage that may affect the part’s strength or secure fit.
How long does forged carbon fiber repair and curing take?
A DIY carbon-fiber repair is estimated at 4 to 12 hours, including learning, application, and curing. That estimate doesn’t mean the part is ready for sanding or use immediately. Cure schedules vary by epoxy system, and some room-temperature products need 24 to 48 hours for a full cure. Follow the resin maker’s instructions and allow the repair to harden before finishing it.
What are the risks of sanding or repairing forged carbon fiber yourself?
Over-sanding can remove sound fibers, enlarge the damaged area, or leave a finish that doesn’t match the surrounding weave. Carbon-fiber dust and repair chemicals can also expose skin or eyes during work. Keep dust away from your face and avoid sanding into intact threads. If dust or chemicals enter your eyes, flush them with water for at least 15 minutes.