
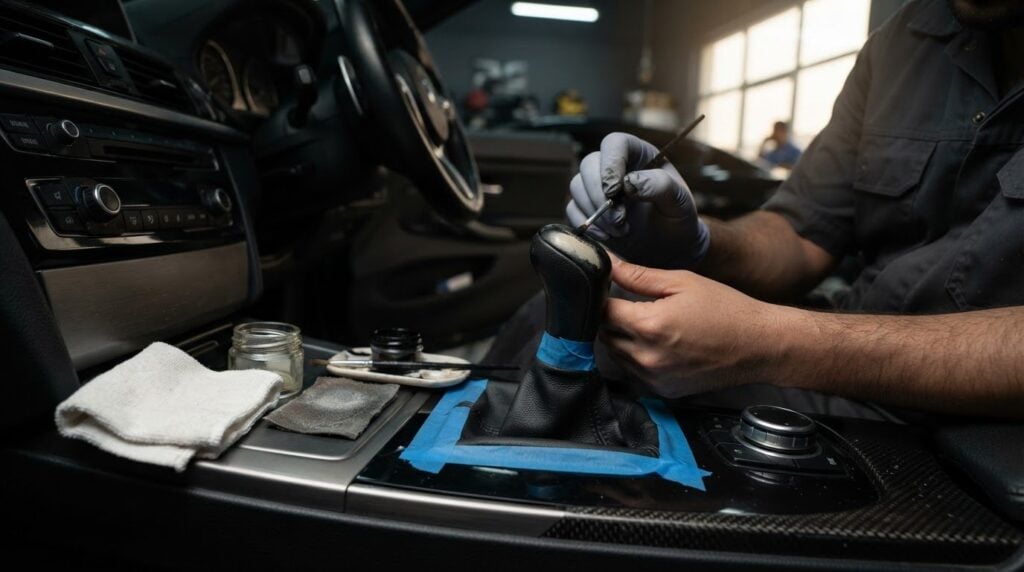
A scuffed leather gear knob can often be refreshed, but cracked, peeling or badly worn leather may need rewrapping or replacement. Restoring a worn leather gear knob starts with cleaning and assessing the surface, then repairing damage, restoring colour and protecting the finish. Preparation and application can take 30-60 minutes; the repair must dry fully before the knob returns to use.
It’s frustrating when a small, high-touch detail makes the whole cabin feel worn. The right fix depends on the damage: surface scuffs and fading call for a different approach than lifted leather, exposed backing or damaged stitching. Assessing the knob first helps avoid applying colour or coating where the leather needs a more substantial repair.
This guide explains how to prepare and clean the knob, assess whether fading or scuffs are repairable, and care for the restored finish. You’ll also learn when rewrapping or replacement makes more sense, so you can choose an approach that suits the leather’s condition and your interior.
Key Takeaways
- Clean the leather carefully before repair so dirt and residue don’t interfere with the finish.
- Match the repair approach to the damage: light scuffs, fading and peeling call for different solutions.
- Allow each repair layer to dry fully before using the gear knob, then maintain the finish with suitable leather care.
- Choose rewrapping or replacement when the leather is too damaged for a surface repair.
- For more extensive leather wear, Vanguard Motors Dubai offers leather restoration as a professional repair option.
Preparing and cleaning the knob
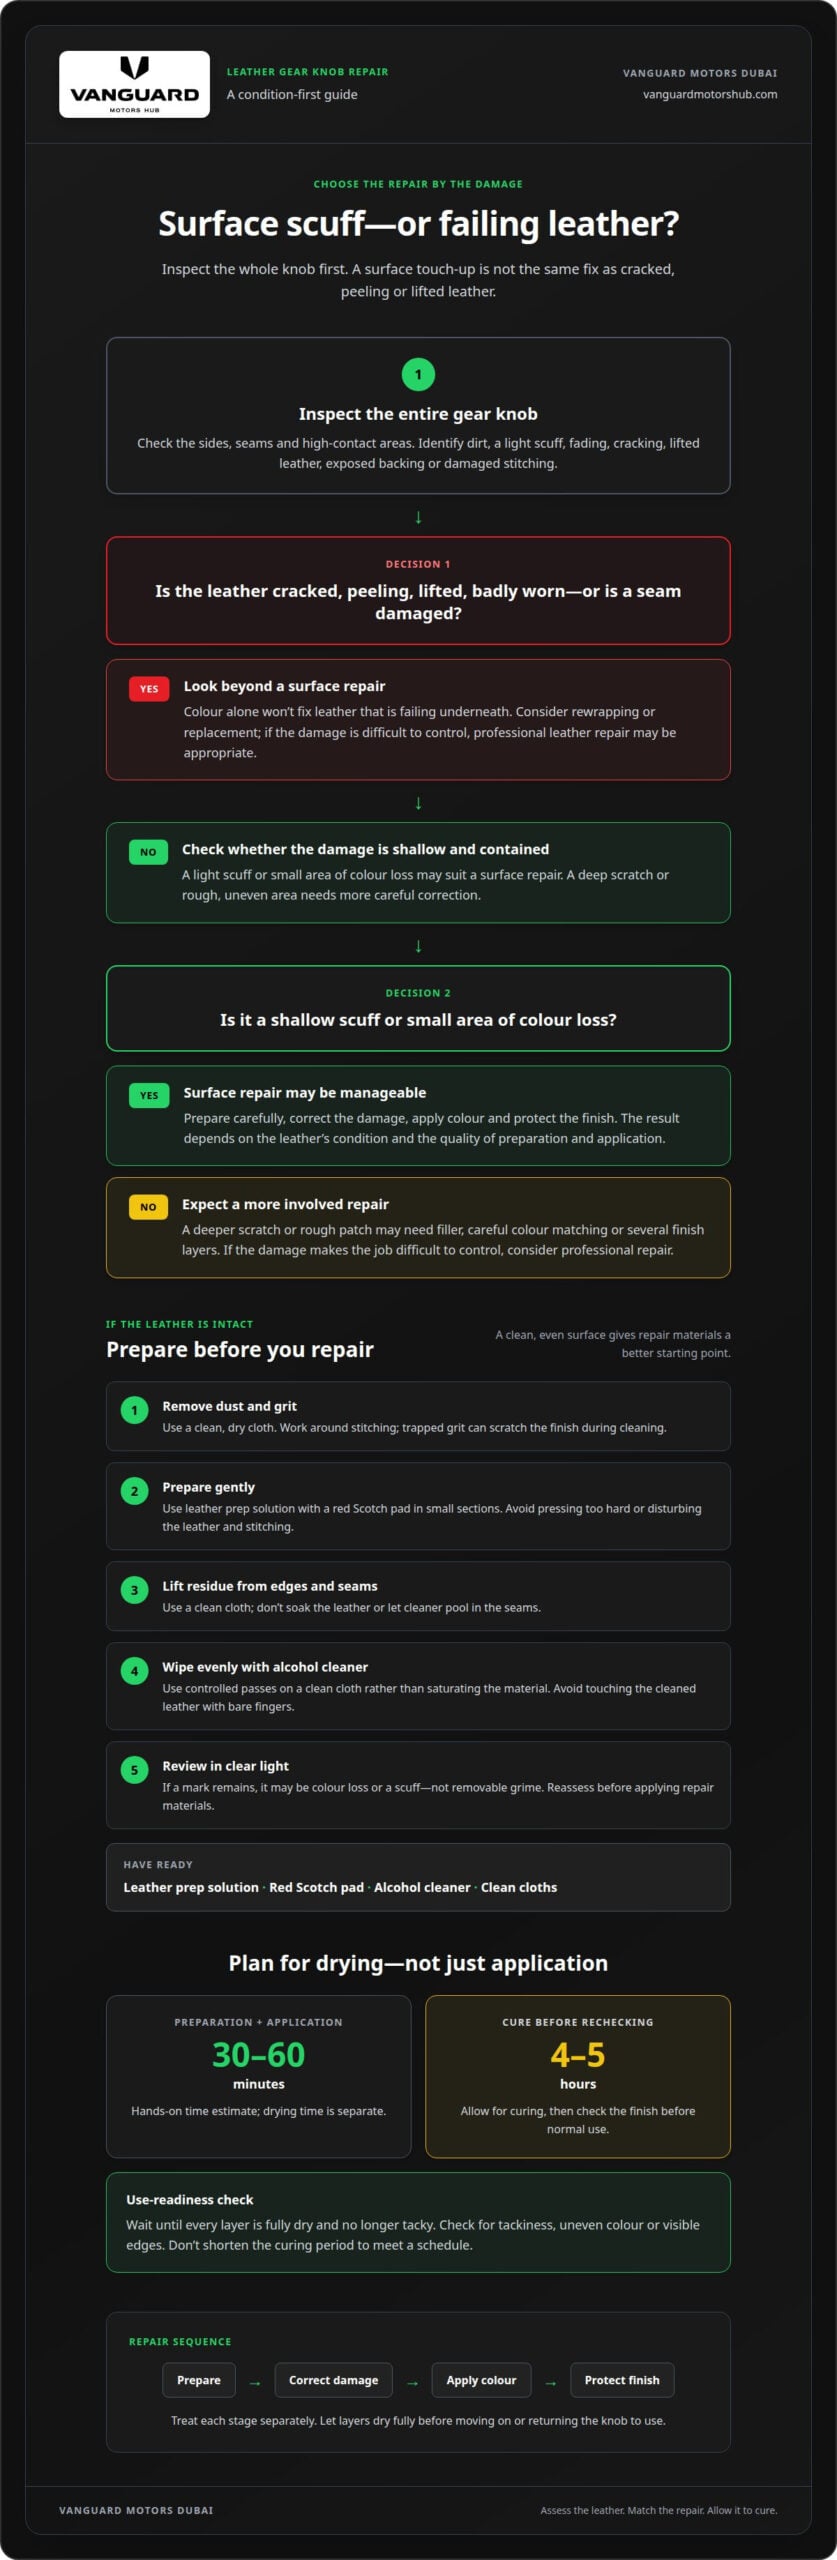
Before starting, gather leather prep solution, a red Scotch pad, alcohol cleaner and clean cloths. These help remove surface residue and prepare the leather for repair without rushing the cleaning stage.
- Inspect the leather before cleaning. Examine the whole gear knob, including its sides, seams and high-contact areas. Identify whether the damage is dirt, a light scuff, fading, cracking or lifted leather. A dark mark on the surface may need cleaning, while a rough, exposed patch needs more than preparation. This inspection helps you focus on the actual damage rather than treating every mark as a stain.
- Remove loose dust first. Use a clean, dry cloth to lift dust and grit from the knob’s contours. Work around the stitching so you don’t push debris into it. Grit trapped beneath a pad can scratch the finish during cleaning. Check the cloth as you go and switch to a clean section if it picks up visible dirt.
- Apply leather prep solution with a red Scotch pad. Dampen the pad with the prep solution, then gently work over the leather in small sections. Follow the knob’s shape and give worn areas controlled attention. The pad helps prepare the surface, but pressing too hard can disturb the leather or stitching. Keep it away from surrounding trim where possible.
- Clean residue from edges and seams. Use a clean cloth to lift loosened residue from the surface and around the stitching. Don’t soak the leather or let cleaner pool in the seams. If residue remains in a crease, use a lightly dampened corner of the cloth and wipe carefully. A clean, even surface gives repair materials a better starting point.
- Wipe the leather with alcohol cleaner. After prep, use alcohol cleaner on a clean cloth and wipe the gear knob evenly. Several independent sources recommend this sequence for preparing a leather gearstick. Use controlled passes rather than saturating the material, especially beside stitched joins. The aim is to remove remaining surface contamination, not to scrub away the leather’s texture.
- Keep bare hands off the cleaned surface. After applying alcohol cleaner, avoid touching the leather with bare fingers. Finger grease and sweat can transfer back onto the prepared surface. If needed, hold the knob by an uncleaned edge, or leave it untouched while you prepare the next repair materials.
- Review the surface before moving on. Check the knob in clear light for remaining dirt, uneven areas or exposed damage. If a mark remains after cleaning, don’t assume it is removable grime; it may be colour loss or a scuff that needs repair. This final check separates the cleaning stage from the repair decision when restoring a worn leather gear knob.
Repair difficulty and time required
A scuff repair is generally a beginner-to-intermediate task, depending on the damage and finish. Allow for both hands-on work and drying time when planning the repair.
-
Assess the repair difficulty
Classify the damage before choosing a repair method. A shallow scuff or small area of colour loss is simpler to address than a deep scratch, peeling surface or damaged seam. The task becomes more involved if the leather needs filler, careful colour matching or several finish layers. Don’t treat a structural tear like a surface mark; it needs more than a quick touch-up.
-
Estimate the time required
Allow 30-60 minutes for preparation and application on a leather gear knob. That estimate covers hands-on work, not the full wait before use. Repair layers need time to dry, and a repair may need 4-5 hours to cure before rechecking. Plan around the slower stage, rather than assuming the knob is ready as soon as application ends.
- Break the repair into stages. Treat preparation, damage correction, colour application and protective finishing as separate steps. This makes it easier to identify where extra care is needed. A small scuff may need limited correction, while a rough or uneven area can take longer to prepare before colour is applied. Rushing between stages can compromise the finish.
- Set up before applying repair materials. Arrange the materials and work area in advance so you can apply products carefully. Keep the knob accessible and make sure there’s enough light to see the repair clearly. A curved surface can be harder to cover evenly than a flat panel. Working methodically helps prevent missed edges and uneven colour.
- Account for the condition of the leather. The same repair method won’t suit every worn knob. A contained scuff may be manageable as a surface repair, but cracking, peeling or a damaged seam makes the job more complex. Check whether the material is intact around the mark. If the leather itself is failing, surface colour alone won’t fix the underlying damage.
- Judge completion by the finish, not the clock. Inspect the repaired surface after its layers have dried, looking for tackiness, uneven colour or visible edges. Don’t shorten the curing period simply to meet a planned schedule. If deep damage makes the job difficult to control, discuss professional leather repair as the next step.
Aftercare and safe use
Let every repair layer dry fully and lose its tack before using the gear knob. DIY durability depends on surface preparation, finish application and the friction of frequent handling.
-
Wait for the repair to cure
Keep the vehicle parked until the repaired surface is fully dry and no longer tacky. A leather gear knob repair should cure for 4-5 hours before it’s rechecked for normal use. Treat that period as a minimum checkpoint, not permission to drive while any layer still feels sticky. Touching a tacky finish can leave marks or disturb the coating.
-
Maintain the restored leather
Use a leather conditioner to care for the finished surface, applying it gently with a clean cloth. A forum participant recommended conditioning leather after applying black shoe dye. Avoid pressing hard over repaired edges, where friction can affect the finish. For routine cleaning, use a product intended for leather rather than an abrasive pad or harsh household cleaner.
- Keep the finish clean without scrubbing. Wipe away dust and light residue with a soft, clean cloth. If the knob needs more attention, apply leather cleaner to the cloth rather than soaking the surface. Wipe the grip evenly, then remove any residue. Repeated hard rubbing can wear a freshly restored area faster than gentle, controlled cleaning.
- Watch high-contact areas. Inspect the top, sides and stitching where your hand grips the knob during shifts. Look for returning colour loss, rough patches or edges beginning to lift. These changes can indicate wear to the coating. Addressing a small surface issue early is easier than letting repeated contact worsen the damage.
- Judge durability by the repair and its use. A DIY finish has no fixed lifespan across all vehicles. Frequent gripping, the leather’s condition and the quality of preparation affect how well the repair holds. A smooth, lightly scuffed knob puts different demands on a coating than cracked leather or a damaged seam. Inspect the finish periodically, especially after cleaning.
- Recoat only when the surface needs it. A leather gearstick finishing process may call for four coats of clear top coat lacquer. Follow the product directions and let each layer dry. Don’t apply fresh lacquer over a tacky or uneven finish. If wear returns through the coating or the leather starts peeling, another top coat won’t fix the underlying damage.
- Return to use only after a final inspection. Once the finish has cured, check that the knob feels dry and smooth across the full grip. Look for sticky spots, loose edges and uneven patches before shifting. If any layer is still tacky, leave the vehicle parked and allow more drying time. Use the knob only when the finish is stable.
Colour loss and fading
- Decide whether the mark is fading or surface damage. Compare the worn patch with nearby leather in consistent light. A smooth, pale area suggests colour loss, while a rough edge or exposed fibres points to physical damage. Don’t try to fix both with colourant alone. A coating can improve appearance, but it won’t rebuild leather that has worn away.
- Check the colour across the whole grip. Look at the top, sides and stitched edges, not just the most visible faded spot. Gear knobs often wear unevenly where the hand rests, so a local touch-up may stand out against darker surrounding areas. Before applying colourant, decide whether the colour change is isolated or spread across the surface.
- Choose a leather colourant suited to the existing finish. Select a colour that closely matches the knob and test it on a discreet area first. Let the test dry before judging the shade, since wet colour can look different once dry. A small test also shows whether the colour sits evenly or highlights the leather’s texture and wear.
- Apply colourant in controlled, light passes. Work over the faded area without flooding seams or creases. Build coverage gradually and check the result as you go. Applying too much at once can leave an uneven surface or obscure the leather’s natural texture. Where the faded area meets a darker section, blend carefully to avoid a sharp colour line.
- Refine the coloured surface carefully. After applying leather colourant, the surface can be lightly sanded with 1200-grit sandpaper. Use a gentle touch and keep the motion controlled, especially near stitching and edges. Sanding too firmly can disturb the new colour or expose the worn layer beneath it. Remove loose residue before deciding whether another application is needed.
- Repair damaged texture before recolouring. A scratch or worn patch with missing material needs more than a colour match. Leather filler or fibre binder can help repair the damaged area before you restore the colour. Keep the repair limited to the affected section, then assess the surface before applying colourant. Colouring over an uneven repair can make the defect more noticeable.
- Reassess the result in the vehicle’s cabin. View the finished knob from the driver’s seat in clear light. Check whether the colour blends across the grip, the texture remains visible and the seams are clean. If most of the knob is faded or the leather is peeling, recolouring may not address the underlying wear. That distinction helps you decide whether surface restoration is suitable.
Replacing or rewrapping a worn leather gear knob
Choose between surface repair, rewrapping and replacement based on the leather’s condition and how it is attached. The right option depends on whether the damage affects the colour, the material or the knob itself.
-
Assess whether restoration is possible
Inspect the whole grip and stitching before choosing a repair. A shallow scuff or isolated fading may suit surface restoration, while peeling leather, missing material or failed seams can call for rewrapping or replacement. For example, one documented Acura CL-S knob used three leather pieces, with the existing leather measured at about 1 mm thick. That example shows why construction varies, not a universal specification.
Choose replacement if the knob or its attachment is damaged, rather than just its leather cover. If the core is sound, rewrapping can preserve it while renewing the surface.
-
Choose whether to remove the knob
Decide whether you can reach the repair area while the knob is installed. A small, contained surface repair may be possible in place, but rewrapping usually requires access to the leather edges and stitching. Removing the knob can make these areas easier to reach, but the safe method depends on the vehicle’s design.
Before working in place, protect nearby trim from tools and repair materials. If replacing the cover, use the old leather as a pattern if it comes away intact. Its stitching holes can guide matching holes in the new leather, and a glue stick can temporarily hold the replacement cover while you sew.
-
Remove the knob without damaging the mechanism
Find the removal method for the specific vehicle before handling the knob. Locate any visible fastener or retaining feature, then follow the vehicle’s model-specific service instructions. Don’t twist, pry or pull forcefully: resistance may mean a fastener or mechanism is still engaged.
Keep the gear selector secure and avoid putting force on the shift shaft or surrounding trim. If the attachment is hidden or the knob doesn’t release as instructed, stop instead of improvising. A universal removal method could damage a vehicle-specific retainer or connected component.
After removal, keep the knob and any fasteners together. Photograph their positions to help preserve the original orientation during reassembly. If rewrapping, use the removed cover’s shape and stitching pattern as a guide, not as a template for a different knob.
A worn cover with intact stitching may be a rewrapping candidate; extensive material loss or a damaged core points toward replacement. For a tailored repair assessment, discuss leather restoration.
Vanguard Motors Dubai: Leather Restoration
Vanguard Motors Dubai provides Leather Restoration for worn, scuffed or faded vehicle interiors. If a gear knob’s damage goes beyond a simple surface mark, professional restoration is a practical next step. The condition of the leather, stitching and underlying material helps determine whether repair or rewrapping is appropriate.
Bring the issue into focus by describing what you see: colour loss, cracking, peeling or a damaged seam. This gives the restoration discussion a clear starting point and keeps the decision centred on the knob’s condition. For leather wear that needs more than routine cleaning, contact Vanguard Motors Dubai to discuss Leather Restoration.
Choose the right next step for your interior
A gear knob is a small detail that plays a constant part in the driving experience. Let its condition guide the level of care: preserve sound leather, address surface wear and consider a new covering when the material has deteriorated. Restoring a worn leather gear knob works best when the repair suits the underlying condition, not just the visible colour.
If the damage is difficult to assess or the finish needs more than a simple refresh, Vanguard Motors Dubai’s Leather Restoration can help. The company also provides Paint Protection Film (PPF) Installation, Colored Sticker Wraps and Peelable Paint Applications for other vehicle appearance needs. Each service addresses a different part of the vehicle, so choose the one that matches the work you need.
Ready to discuss the right approach for your interior? Contact Vanguard Motors Dubai and take the next step toward a carefully finished cabin.
Frequently Asked Questions
How to fix a scuffed leather car shift knob?
Clean the scuffed area and check whether the leather is intact, then choose a repair suited to the damage. A shallow mark may need colour restoration, while a gouge or missing material needs filling before recolouring. Test the colour in a discreet spot first. If the scuff crosses stitching or the leather is peeling, don’t cover it with dye alone; that won’t address the underlying damage.
What does professional repair cost?
Professional repair costs depend on the damaged area, the leather’s condition, colour matching and whether the work requires filling or refinishing. A repair limited to surface colour loss differs from one involving torn material or stitching. Request a quote for Leather Restoration to get a cost based on the specific work required. Share clear details of the damage so the quote can reflect its scope.
How do you clean and prepare worn leather on a gear knob for repair?
Remove loose dust with a clean cloth, then use leather preparation products to clean the surface. Keep residue out of the stitching and avoid soaking the leather. For example, lift grime in a seam gently with a cloth corner instead of scrubbing it deeper with an abrasive tool. Once cleaning is complete, keep fingers off the prepared surface so oils don’t transfer before you apply repair materials.
How do you repair peeling, cracked, or scratched leather on a gear knob?
Match the repair to the damage. A scratch with intact material may need careful colour correction, but cracks and peeling require attention to the weakened surface first. Leather filler or fibre binder can help rebuild damaged areas before recolouring. If an edge has lifted, don’t simply paint over it: it can remain visible and continue separating. Extensive deterioration may make rewrapping or replacement more suitable.
How do you recolor and seal a leather gear knob after restoration?
Apply leather colourant in controlled, light layers, letting each application dry before assessing the shade. A discreet test helps show whether the colour blends with the surrounding surface. Once the colour is even, use a compatible clear finish for protection, following the product directions. Don’t apply a heavy coat to hide unevenness, as excess material can leave a noticeably different texture.
How long does gear knob leather restoration take, and how long should it cure?
Preparation and application typically take 30-60 minutes, but drying and curing extend the time before the knob is ready. Allow the repair to cure for 4-5 hours before rechecking, and don’t drive until every layer is fully dry and no longer tacky. For example, a finish that feels sticky after the initial wait needs more drying time before normal handling.
What does professional gear knob re-leathering cost compared with a replacement knob?
Re-leathering and replacement costs depend on the vehicle, the knob’s construction and the work required. Rewrapping can retain an intact knob, while replacement is relevant if its core or attachment is damaged. Base your comparison on the labour and replacement part required for your vehicle rather than overseas prices. Request a quote for Leather Restoration to clarify the repair scope and cost.
What safety precautions apply when using leather dyes, adhesives, and sealers inside a car?
Read each product label before use, and keep dye, adhesive and sealer away from switches, screens, glass and painted trim. Cover nearby surfaces appropriately and use products only as directed in a well-ventilated work area. Don’t mix repair products or apply fresh material over a tacky layer. Store containers securely outside the vehicle after finishing the work.