
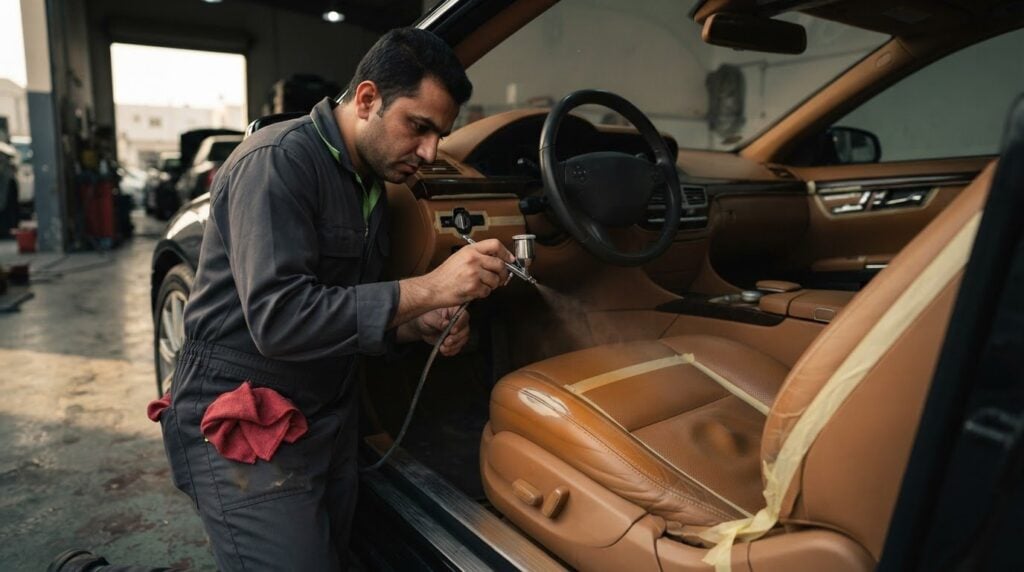
Fresh colour won’t fix cracked leather. For effective color restoration for faded leather seats, a professional first assesses the surface and repairs cracks that catch a fingernail before applying colour. This preparation helps create a more even, refined finish.
Fading often appears first on high-touch areas, where sunlight, friction, body oils and repeated use dull the original tone. Matching the colour matters, but the leather’s condition and finish matter just as much. A product suited to one surface may not absorb or perform the same way on another.
This guide explains how professionals clean seats, assess wear and choose between a recolouring balm and a colourant. You’ll also learn why cracks and gouges need attention before colour is applied, how thin coats help preserve the leather’s grain, and how to care for the restored finish. The aim is to refresh the surface, not just change its shade.
Key Takeaways
- Proper cleaning removes residue that can disrupt an even finish, and the leather should dry naturally before colour is applied.
- Professionals assess whether the leather is smooth and sealed or porous, then select a recolouring product to suit its surface and the desired colour change.
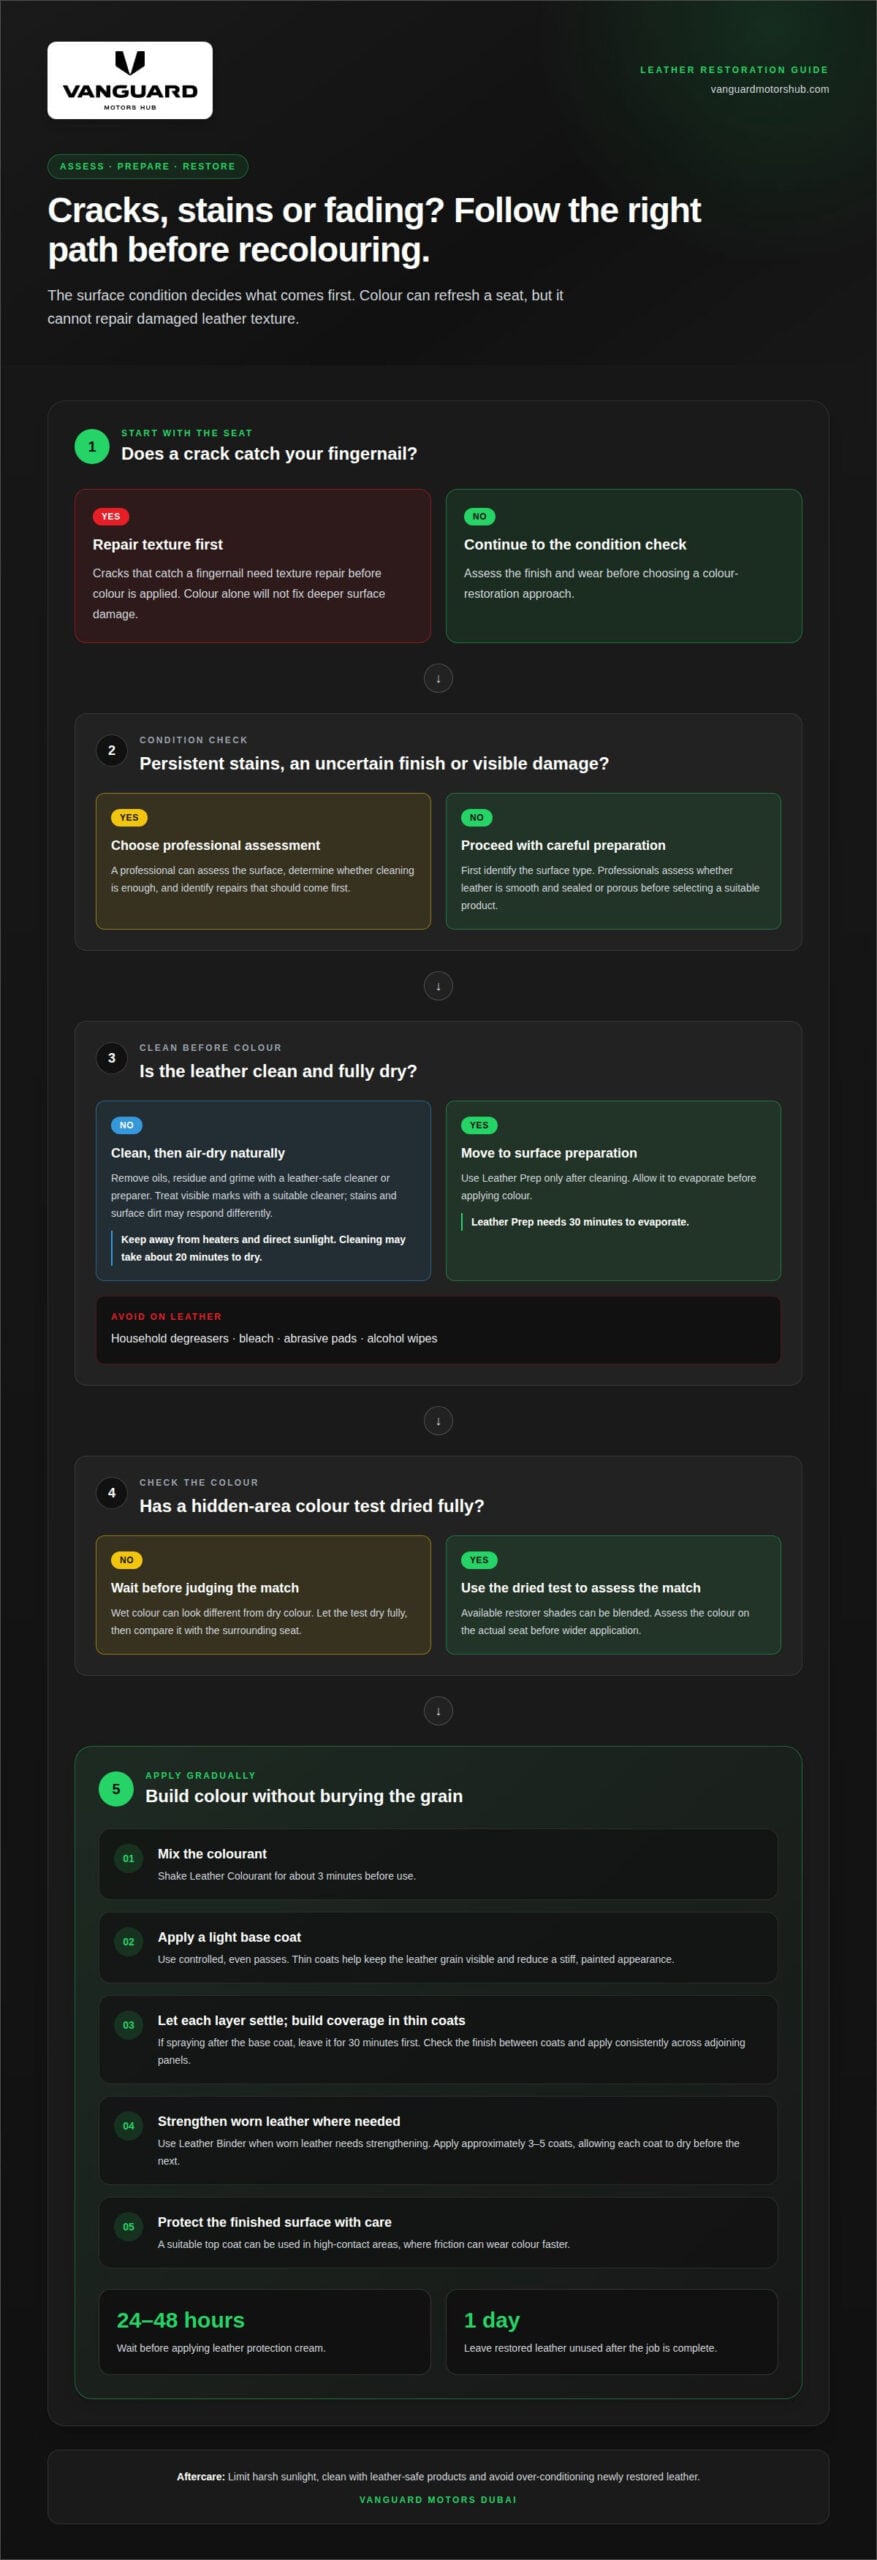
- Cracks that catch a fingernail need texture repair before recolouring; colour alone won’t fix deeper surface damage.
- Several thin coats help retain the leather’s grain and natural feel better than one heavy application.
- Vanguard Motors Dubai provides Leather Restoration for faded or damaged seats, with other vehicle-finish options available when a broader aesthetic change is the goal.
Professional cleaning and stain removal before color application
Professionals prepare leather before recolouring because cleaner residue and embedded oils can disrupt even coverage. Follow the sequence: assess, clean, remove stains, then let the surface dry completely.
-
How professionals clean the leather surface
Start by assessing the seat’s finish, wear and soiling. A professional cleans finished smooth leather with a leather-safe cleaner or preparer, working across the surface to remove oils, residue and everyday grime. The cleaner must suit the leather; household degreasers, bleach, abrasive pads and alcohol wipes can damage or affect the finish. After cleaning, let the surface dry naturally, away from heaters and direct sunlight.
-
How professionals remove stains before application
Identify each visible mark before treating it, since oily residue and surface dirt may respond differently. A professional uses a leather-safe cleaner or preparer on the affected area, avoiding harsh household products that could alter the finish. Stain removal is part of preparation, not a substitute for colour: residue can interfere with even coverage. After cleaning, let the leather dry with natural airflow rather than forced heat.
-
How professionals prepare leather for color
Use Leather Prep only after cleaning, then allow it to evaporate for 30 minutes before colour application. Cleaning itself may take about 20 minutes to dry, but the surface must be assessed rather than rushed. A hidden-area colour test should dry fully before the match is judged. Available restorer shades can be blended, while a test reveals how colour appears on the actual seat.
- Choose professional treatment for seats with persistent stains, uncertain finishes or visible damage. At-home products may suit a straightforward surface refresh, but a professional can assess whether cleaning is enough or repairs must come first. To match the colour, the professional compares a hidden test area after it has dried completely with the surrounding seat; wet colour can look different.
- Allow time for cleaning, natural drying, preparation and application. Leather Prep needs 30 minutes to evaporate, while cleaned leather may take about 20 minutes to dry. Total time depends on the seat’s condition and the work required. Longevity depends on use and care, including limiting harsh sunlight and avoiding damaging cleaners.
- Prevent peeling, cracking and colour transfer by removing residue and applying colour to properly prepared leather. A poor surface match or rushed drying can undermine the finish, so a fully dry test on a hidden area helps assess the colour before wider application. Deep cracks need more than cleaning: recolouring changes appearance but does not repair damaged texture.
- In the UAE, reduce further fading by parking out of harsh direct sunlight where possible. Keep restored seats clean with leather-safe products, not alcohol wipes, bleach, abrasive pads or household degreasers. Avoid over-conditioning newly restored leather, as it can soften the finish, attract dust or change its sheen.
How professionals apply color in thin coats
Professionals build colour gradually rather than covering faded leather with one heavy layer. Each coat needs controlled application and drying time to help the finish retain the seat’s grain and flexibility.
- Shake Leather Colourant for about 3 minutes before use. This distributes the colour evenly through the product before application. A consistent mixture helps each pass deposit a uniform layer, rather than leaving concentrated pigment in some areas and weaker coverage in others. Prepare the chosen colour before beginning, so the application can proceed in a steady sequence.
- Apply a light base coat across the prepared leather. Use controlled, even passes and avoid applying too much product in one area. Thin coverage keeps the original grain visible and reduces the risk of a stiff, painted appearance. Pay close attention to seat edges, seams and high-contact panels, where uneven application can stand out against adjacent sections.
- Allow the base coat to settle before adding another layer. If the process calls for spraying after the base coat, leave it for 30 minutes first. That interval gives the initial layer time to dry before the next application. Follow the product’s application sequence rather than rushing to deepen the colour with a heavy coat.
- Build coverage with several thin coats, checking the finish between applications. A thick layer can hide the leather grain, create stiffness and look painted. Thin layers develop the colour gradually while preserving texture. Work across adjoining seat panels consistently so the tone doesn’t shift noticeably between the centre cushion and side bolsters.
- Use Leather Binder where worn leather needs strengthening before colour. Apply approximately 3-5 coats, allowing each coat to dry before applying the next. This sequence addresses the worn surface rather than relying on colourant to disguise it. Keep the application controlled around creases and seams, where excess product can collect and make the finish feel less natural.
- Finish with a suitable top coat in high-contact areas, where friction can wear colour faster. After color restoration for faded leather seats, wait 24-48 hours before applying leather protection cream. Leave the restored leather unused for 1 day after the job is complete. For guidance on a seat-specific finish, discuss the right approach for your seats.
How professionals choose between recolouring balm and colourant
Professionals match the product to the leather’s finish, absorbency and condition. The desired result matters too: refreshing the original tone differs from changing the colour or addressing worn texture.
- First assess the desired result. For smooth finished leather with faded pigment and a mostly intact surface, recolouring balm can refresh the existing colour. It’s a practical choice when the aim is to revive the original shade, not make a major colour change. Professionals also consider whether the surface will absorb the balm.
- Use a water-drop test on a discreet area to assess absorption. If the water absorbs, the leather is porous, which may suit balm application. If it beads on the surface, the leather has a sealed or non-absorbent finish. That result points away from balm and helps guide the choice toward colourant.
- A non-absorbent surface may call for a different recolouring approach. A protective finish can prevent recolouring balm from soaking into the leather, limiting its effectiveness. In this case, the Leather Colourant Kit is more appropriate. The professional still considers the seat’s current shade and intended result before proceeding.
- Inspect cracks before choosing a product. Recolouring balm restores colour, but it doesn’t repair cracks or replace missing texture. If cracks appear darker than the surrounding leather, the guide recommends the Leather Colourant Kit. Cracks that catch a fingernail need texture repair before colour is applied, so product choice should follow an assessment of the damage.
- Distinguish colour fading from structural wear. A seat with faded pigment but an intact surface may need only a colour refresh. Deep cracks, peeling or sticky areas present a different preparation challenge. Balm is not a repair compound, and colourant should not be expected to correct damaged leather texture.
- Confirm the shade on a hidden area and let it dry completely before judging the match. A wet test can look different from the finished colour, so professionals compare the dry result with adjacent leather. They then choose the method that suits both the finish and the desired colour change. This avoids selecting balm simply because the seat looks faded.
The decision depends on the seat’s condition: absorbent, smooth leather with modest fading may suit balm, while a sealed surface or darker cracks point toward colourant. Neither product replaces crack repair, and the leather’s finish determines the appropriate approach.
How professionals identify finished smooth leather and assess surface damage
Before choosing a restoration method, professionals identify the leather finish and map visible damage. Suede, nubuck and peeling surfaces need a different assessment from smooth finished leather.
- Inspect the seat in good light, including the centre panels, bolsters, seams and high-touch areas. Finished smooth leather usually has a consistent surface coating, while suede and nubuck have a textured nap. Raw leather also behaves differently during recolouring. Identify the material first to avoid applying a smooth-leather method to a surface that may respond unpredictably.
- Look for signs of a sealed finish before selecting a product. A professional can place a water drop on a discreet area: absorption indicates porous leather, while beading suggests a sealed or non-absorbent surface. This helps guide product selection, but it doesn’t reveal the leather’s full condition. The technician also examines wear, cracks and changes in texture.
- Distinguish faded pigment from physical damage. A seat with a mostly intact surface and uneven colour may be suitable for refreshing. By contrast, peeling, stickiness or heavy cracking makes the smooth-leather restoration method less predictable. Note where each issue appears, such as a faded driver’s bolster or a split seam, before planning further work.
- Gently run a fingernail across cracks. If a crack catches, the texture has changed, and colour alone won’t correct it. Mark those areas for repair before recolouring. Fine surface lines that don’t catch still need assessment, but they differ from deeper gouges that interrupt the leather’s surface.
- Check whether the surface is sticky, peeling or heavily cracked. These conditions can affect how colour sits and adheres, so they shouldn’t be treated as simple fading. Suede, nubuck and raw leather are also less predictable candidates for this method. A professional uses these observations to decide whether standard smooth-leather colour restoration is suitable.
- Compare affected areas with protected sections, such as leather beneath a seat edge. This can help distinguish fading from staining or a broader change in the finish. Note whether the colour difference follows sunlight exposure, friction or repeated contact. These patterns help explain the condition and guide the next assessment.
- Consider the findings together rather than treating each test in isolation. A water drop that beads, a crack that catches a fingernail and peeling on one bolster point to different concerns. Professionals weigh finish, porosity and surface integrity before choosing treatment. If cracks interrupt the texture, repair comes before colour; if the surface is intact, product selection can focus on refreshing the tone.
How professionals repair cracks or gouges before restoring color
Colour can disguise fading, but it cannot rebuild a cracked surface. Professionals repair the texture first, then restore colour on the prepared leather.
- Inspect the seat in clear light and map cracks, gouges and worn areas. Check damaged sections individually instead of treating the whole seat as one surface. A crack that catches a fingernail needs texture repair before colour is applied. This simple tactile check distinguishes a surface line from a break that may remain visible after recolouring.
- Distinguish colour loss from structural damage before choosing the repair sequence. A faded panel with intact texture needs different treatment from a gouge or deep crack. Note whether the damage is on a high-contact bolster, cushion or seam. Its location helps the professional assess how the surface has worn and where repairs need to blend with surrounding leather.
- Repair cracks that catch a fingernail before applying colour. Recolouring balm restores colour, but it doesn’t repair cracks or replace missing texture. Applying colour over an unrepaired split can leave its damaged contour visible. The priority is a smoother, more consistent surface, not simply a darker tone across the affected area.
- As part of professional texture repair, fill the damaged area and let the repair settle before smoothing. The repair material and application depend on the damage. Don’t treat a deep gouge like minor pigment fading: colour products change appearance, while a filled repair addresses the uneven surface beneath it.
- Smooth filled cracks with fine 1200-grit sandpaper. Use the fine grit to refine the repair and blend its surface with the surrounding leather. Professionals work carefully, since aggressive sanding can affect adjacent material. The goal is an even transition, not removal of the seat’s natural grain or an unnecessarily broad sanding area.
- Reassess the repaired texture before recolouring. Check the original crack or gouge from different angles and compare it with nearby leather. If the defect still catches a fingernail or forms a visible ridge, further surface work is needed before pigment is applied. This checkpoint helps prevent colour from drawing attention to uneven repairs.
- Apply colour only after the repair is smooth and ready for finishing. A clean transition helps the recoloured area sit more naturally beside intact leather. For seats with cracks or gouges that need professional assessment, arrange a leather repair assessment before recolouring begins.
Vanguard Motors Dubai: Colored Sticker Wraps
Vanguard Motors Dubai offers Leather Restoration for faded, cracked or worn seats that need interior attention. The right next step depends on the condition: colour refreshment suits intact leather, while cracks may need repair before recolouring. If your goal is a broader exterior transformation rather than seat restoration, Colored Sticker Wraps provide a separate styling option. Paint Protection Film (PPF) Installation and Peelable Paint Applications are also available for vehicle-finish projects. These services address different surfaces and goals, so a wrap isn’t a substitute for repairing or recolouring leather. Share whether your priority is the seats or the vehicle’s exterior, then contact Vanguard Motors Dubai to discuss the appropriate direction for your vehicle.
Choose the right next step for your interior
Let the seat’s condition guide your next step. If the leather has cracks or surface wear, a professional assessment can determine whether restoration should address texture as well as colour. For a broader visual refresh, decide whether your priority is the cabin or the exterior before planning the work. That keeps the next step aligned with how you want the vehicle to look and feel every day.
Thoughtful color restoration for faded leather seats is about more than changing the shade. It can bring the cabin closer to the standard you want to maintain. Vanguard Motors Dubai also offers Colored Sticker Wraps, Paint Protection Film (PPF) Installation and Peelable Paint Applications for exterior projects. Each serves a different purpose, from a new look to added surface protection.
Share your priorities and the condition of your seats with the team. Contact Vanguard Motors Dubai today to discuss a suitable direction for your vehicle. A clear starting point makes it easier to move forward with confidence.
Frequently Asked Questions
How do professionals restore color to faded leather car seats step by step?
Professionals assess the finish, clean the leather, repair texture damage, then apply a suitable colour product. For color restoration for faded leather seats, they work across connected panels and compare the dried finish with nearby areas to catch visible tone differences. They then protect high-contact sections and let the finish settle before the seats return to regular use. Each stage addresses a different part of the result.
How do professionals tell whether leather seats need cleaning, recoloring, or replacement?
Professionals distinguish removable soiling from pigment loss by checking whether the colour difference remains after suitable cleaning. They assess cracks, peeling, stickiness and weakened areas separately, since colour treatment won’t restore missing or deteriorated material. Recolouring suits leather with a sound surface and faded pigment; replacement may be considered when the leather is extensively damaged or cannot provide a suitable repair surface. The decision depends on the condition and scope of the repair.
How do professionals choose products for recoloring faded leather seats?
Professionals match the product to the leather’s absorption, existing finish and desired colour result. Balm can suit absorbent, finished smooth leather when refreshing its existing tone; colourant is more appropriate for a sealed surface or cracks darker than the surrounding leather. A restorer range offers 28 blendable shades, while the colourant kit contains 250ml. A fully dried test patch helps assess the shade before broader application.
How do professionals prepare and clean leather seats before applying color restorer?
Professionals remove surface grime and residue with a leather-safe cleaner or preparer, then let the leather dry naturally. This matters around seams and perforations, where trapped cleaner or moisture can affect the finish. They avoid speeding up drying with direct heat or sunlight and don’t use bleach, alcohol wipes, abrasive pads or household degreasers. Once dry, they reassess the surface so remaining stains aren’t mistaken for colour fading.